What we'll cover
Before You Begin
Prerequisites & Installing Coolify on Your VPS
What is Coolify?
Coolify is a free, open-source, self-hostable platform — think of it as your own private Heroku or Vercel, running on your own VPS. You get full control over your apps, databases, and deployments without recurring platform fees (you only pay for your server).
Server Requirements
CPU
2+ vCPUs
RAM
2 GB minimum
DISK
30 GB+ SSD
OS
Ubuntu LTS
Supported Operating Systems
The one-liner install script works on all major Linux distros:
Quick Installation (Recommended)
SSH into your VPS and run this single command. Coolify will install Docker, configure everything, and be ready in minutes:
curl -fsSL https://cdn.coollabs.io/coolify/install.sh | sudo bash
After installation, Coolify is accessible at
http://YOUR_SERVER_IP:8000. Open it in your browser, create your admin account, and
you're in.
Note for Ubuntu Users: The automatic installation script only works with Ubuntu LTS versions (20.04, 22.04, 24.04).
If you're on a non-LTS version (e.g., 24.10), use the Manual Installation method from the official docs.
After Coolify is Installed — What's Next?
-
Open
http://YOUR_IP:8000→ create your admin account - Go to Sources and connect your GitHub account
-
Go to
Projects → New Project
and create a project (e.g.,
ecom → production) - Point a domain at your VPS IP (A record), then configure it under Servers → Domains
- You're now ready — follow Steps 01–06 below to deploy your MERN app
Step 01 — Git Setup
The Monorepo Strategy
The Action
Instead of creating separate GitHub repositories for your
frontend and backend, keep them inside a single parent
folder (e.g.,
Mern_ecommerce). Initialize Git at the root of this parent folder.
# Initialize at root level
git init
touch .gitignore
Your root-level
.gitignore must
contain:
**/node_modules/
**/.env
The Why
Coolify handles monorepos beautifully through a feature
called
Base Directory. By keeping everything in one repository, you connect
GitHub to Coolify once. Deploy the backend by pointing to
/backend and
the frontend to
/frontend.
Never track node_modules. Pushing them to GitHub will take an eternity and clog your repository with tens of thousands of unnecessary files.
Step 02 — Database
Spin Up the Database First
The Action
In your Coolify dashboard, create your MySQL database resource before deploying any code. Once it boots up, go to its settings and copy the Internal Database URL.
# Internal Database URL format:
mysql://user:password@mysql_container:3306/db_name
The Why
Order of operations matters. Your backend Express server requires an active database connection to boot up properly.
- Using the Internal URL is significantly faster and more secure than exposing your database to the public internet
- Internal traffic never leaves your VPS's Docker network — no firewall rules needed
- The container hostname resolves automatically within Coolify's Docker network
Step 03 — Backend
Deploying the Node/Express Backend
The Action
Create a new application in Coolify, point it to your GitHub
monorepo, and set the
Base Directory
to /backend.
Add your environment variables using the Internal Database
URL from Step 2.
Configure Coolify with these exact settings:
Base Directory:    /backend
Build Command:     (leave empty)
Start Command:     npm run db:migrate && node server.js
DATABASE_URL:      mysql://user:pass@mysql_container:3306/db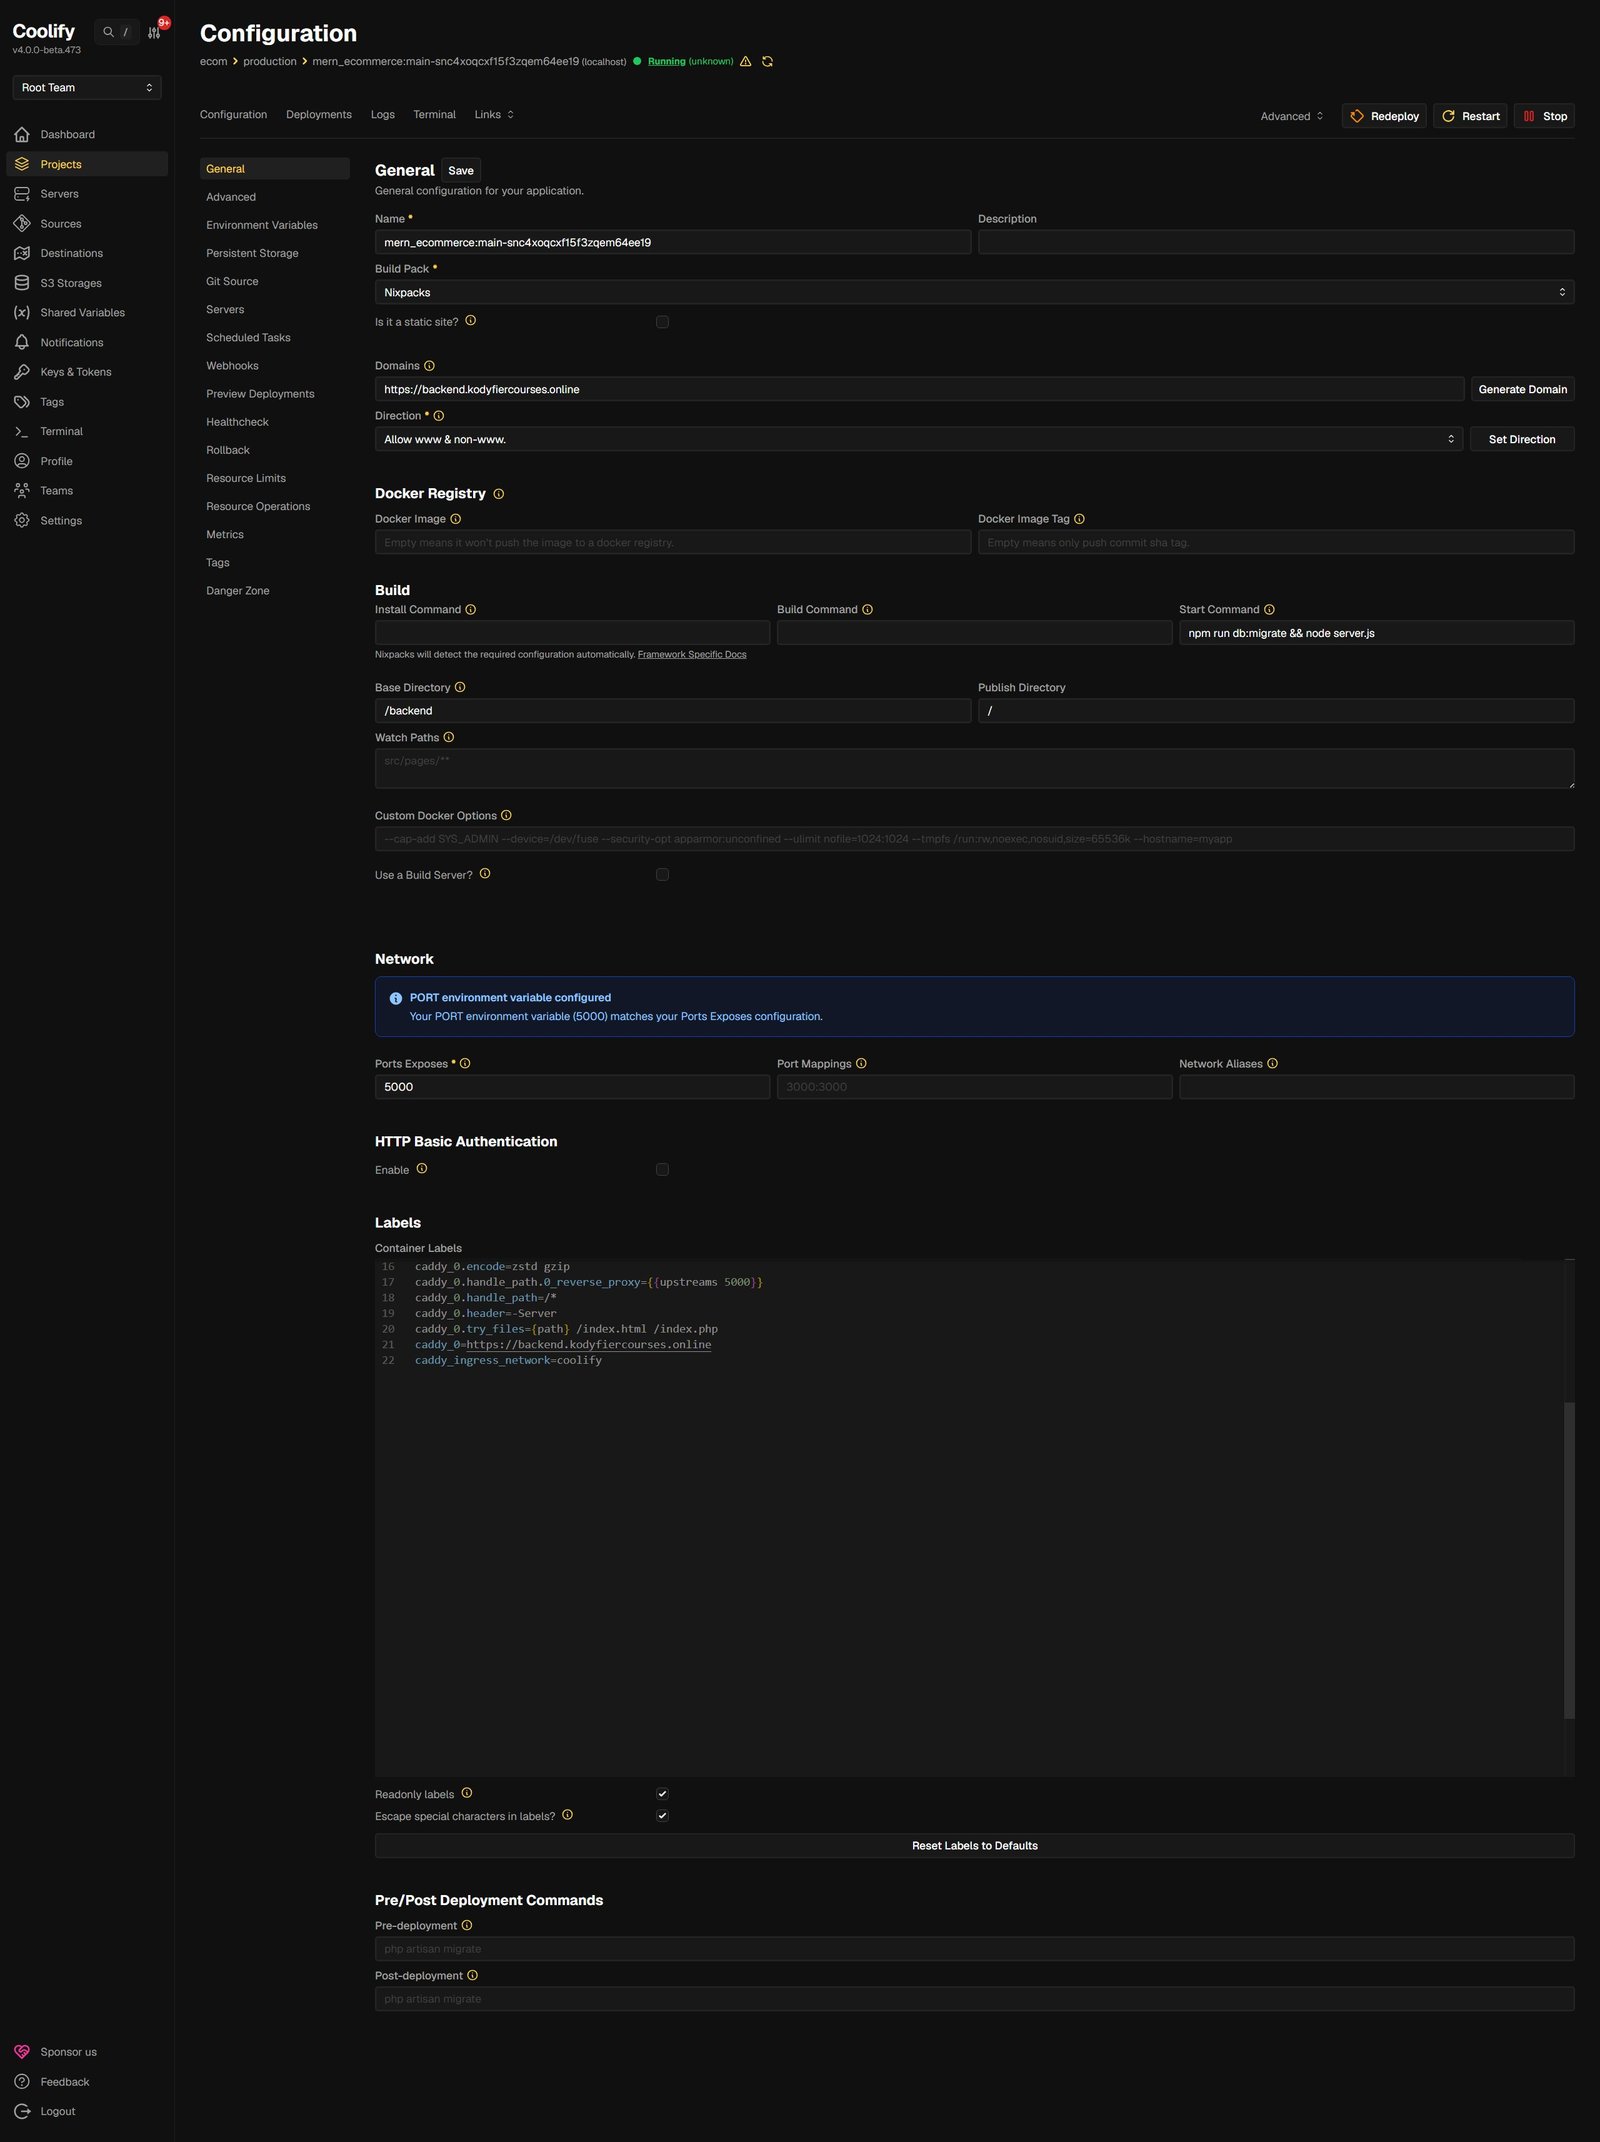
The Why — Migrations at Runtime
You must run Drizzle migrations right before the server spins up so the empty database gets its tables created automatically on every deployment.
Never use npm run dev, nodemon, or
--watch in production.
They waste server resources and can cause infinite restart
loops. Also drop the --env-file=.env flag —
Coolify injects variables directly into the server's memory.
Step 04 — Security
Defeating the Final Boss: CORS
The Action
Before deploying your frontend, update your backend code to
explicitly trust your new live domain. Update
server.js
with the correct CORS configuration:
const allowedOrigins = [
  "http://localhost:5173",        // For local testing
  "https://ecom.yourdomain.online"  // Your live Coolify domain
];

app.use(cors({
  origin: function(origin, callback) {
    if (!origin || allowedOrigins.includes(origin)) {
      return callback(null, true);
    }
    return callback(new Error('CORS policy violation'), false);
  },
  credentials: true
}));
The Why
CORS is a strict browser security measure. If your frontend asks your backend for data, the browser checks the backend's "guest list." If your live domain isn't on that list, the browser blocks the response entirely.
Hardcoding only localhost in production
guarantees a broken app.
The browser will block every single API call with a CORS
error, even if the backend is working perfectly.
Step 05 — Frontend
Deploying the Vite / React Frontend
The Action
Deploy your monorepo again as a new resource in Coolify,
setting the Base Directory to
/frontend.
Base Directory:   /frontend
VITE_API_URL:     https://api.yourdomain.online  ☑ Build Variable
Static Site:      ☑ Yes
SPA:              ☑ Yes (Single Page Application)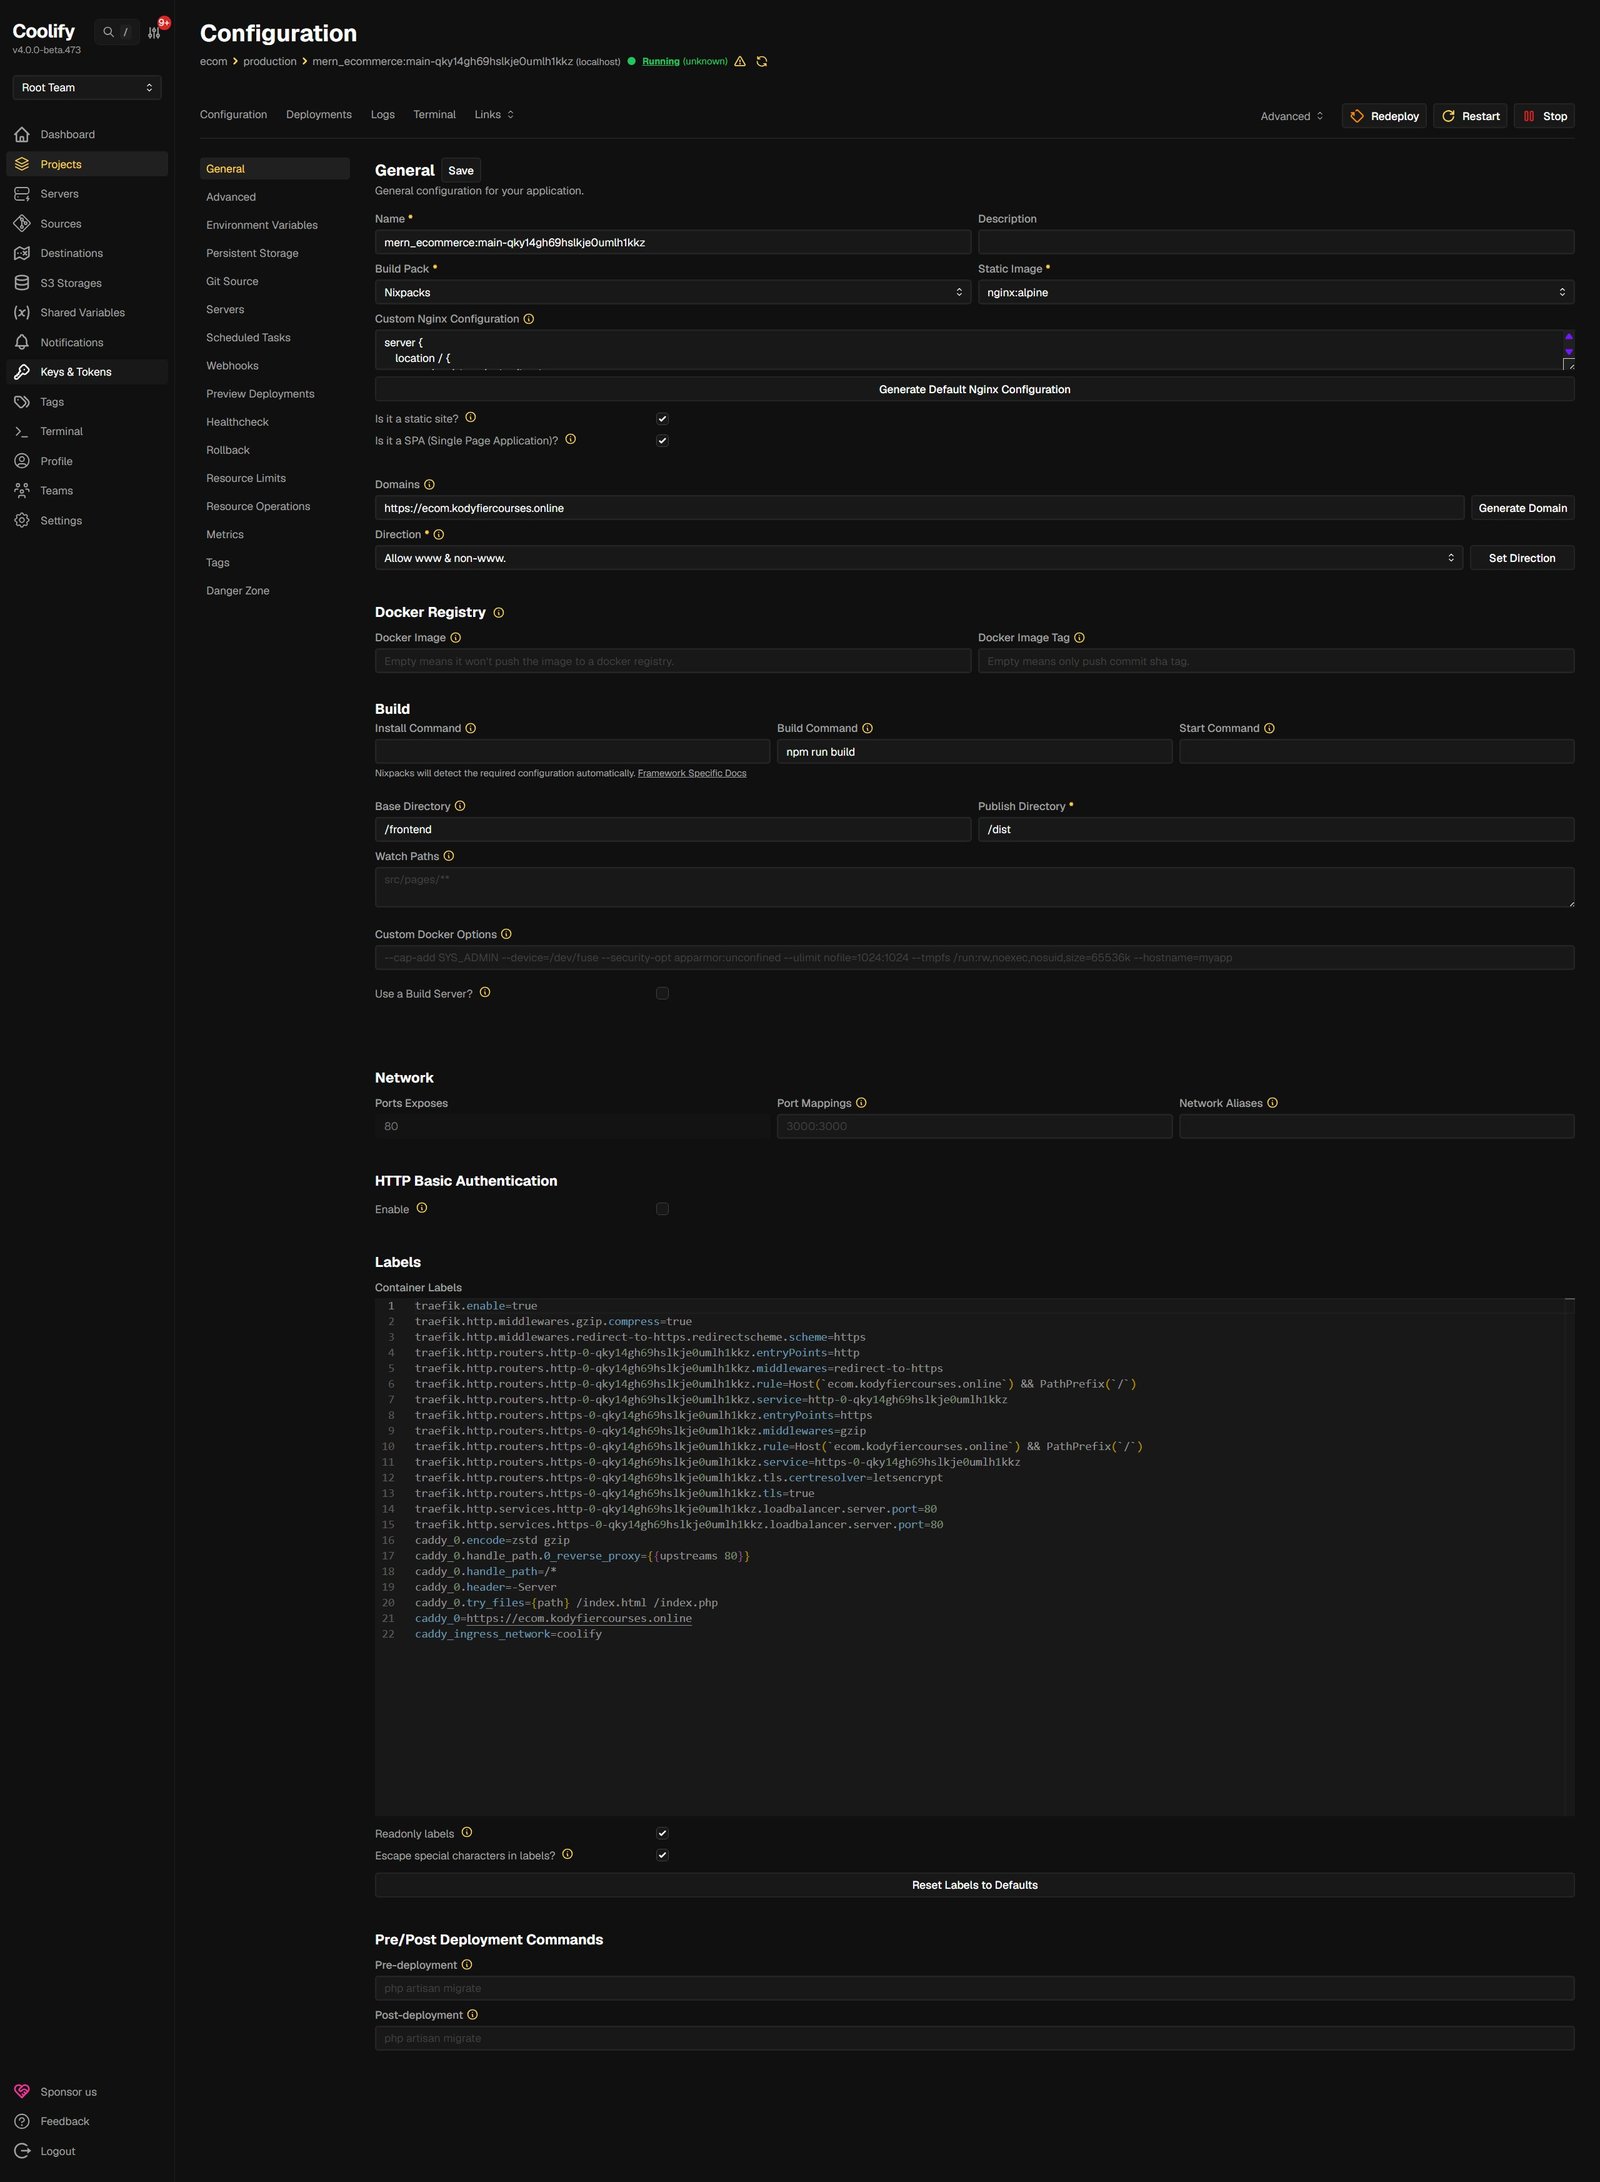
The Why — Build Variables
Vite generates a static site. It doesn't run a live Node server in production. It needs to know the live API URL during the build process so it can bake that URL permanently into your JavaScript files. You must check the "Build Variable" box or Vite will never see it.
Without checking "Is it a SPA?", refreshing
a route like /product throws an Nginx 404
Error. Nginx looks for a physical folder named
product. The SPA toggle configures Nginx to
route all missing paths back to index.html,
letting React Router take over.
Step 06 — Data
Seeding the Production Database
The Action
Once everything is live, your website will load but look empty. Go to the Terminal tab of your Backend Application inside Coolify and run your seed scripts directly:
node src/seed/categories.seed.js
node src/seed/products.seed.js
The Why
Using the Coolify terminal gives you a direct command line inside your live backend container. Running the scripts here executes them with the live production environment variables, securely pushing your data into MySQL without exposing the database to external GUI tools.
- No need to expose MySQL to the public internet or configure remote access
- Scripts run with full access to production environment variables automatically
- Clean, secure alternative to tools like TablePlus or MySQL Workbench for initial seeding
All Done
Deployment Checklist
Infrastructure
- Monorepo initialized with root .gitignore
- MySQL database created in Coolify first
- Internal Database URL copied
Backend
- Base Directory set to /backend
- Migrate + start command configured
- CORS updated with live domain
Frontend
- Base Directory set to /frontend
- VITE_API_URL set as Build Variable
- SPA mode enabled in Coolify
Go Live
- Seed scripts run via Coolify terminal
- Test all routes with refresh
- Verify API calls from live frontend
Discussion